
Introduction
You are the chief programmer for a mission to Mars that has crash landed, and one of your crew is stranded on the other side of the planet! Let's learn how to make our robot move so we can save them.
Tools
No tools specified.
-
-
Let's assemble our robot so we can save the stranded astronaut!
-
Carefully put your robot together exactly like the picture.
-
Make sure you plug the left motor into the left socket (M1) and the right motor into M2!
-
-
-
Load the Arduino IDE that you installed earlier.
-
Click on the Tools > Board menu and select ESP32 Dev Module
-
Plug in your robot with the USB cable.
-
Go to Tools > Port and select the available COM port - your number might be different!
-
If your board ever fails to program, always check the board and port are setup correctly first.
-
-
-
To use the robot, there are a few lines we always need in the program. Make sure you do these steps for every new program you start!
-
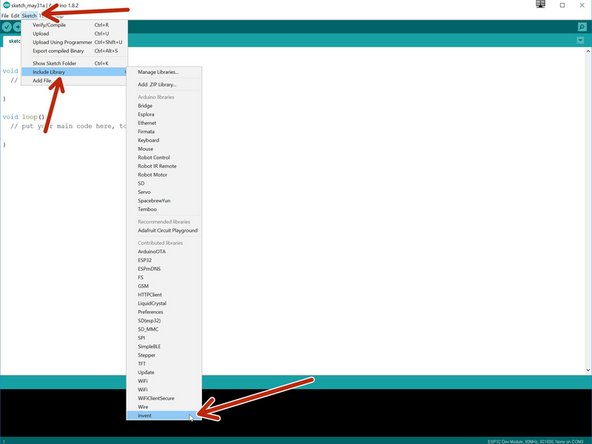
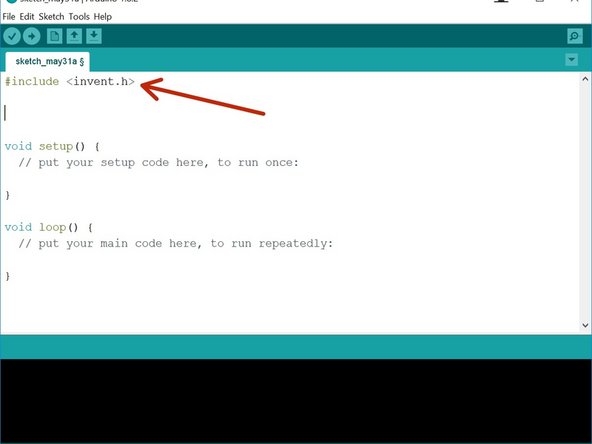
To use the library we installed earlier, we need to include it.
-
Navigate to Sketch > Include Library and click on invent. This should put the line #include <invent.h> at the start of your program.
-
-
-
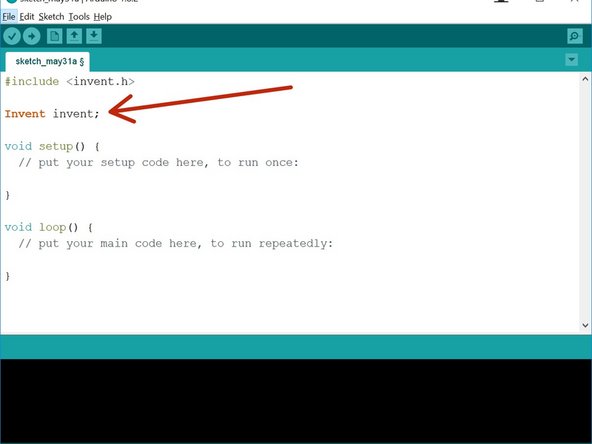
We need one more line to use the library! Don't worry too much about what these lines do at the moment - just make sure they are in your program exactly like the picture.
-
Add the line: Invent invent; directly below the line that includes the invent library.
-
-
-
One more line of code and we can use our robot!
-
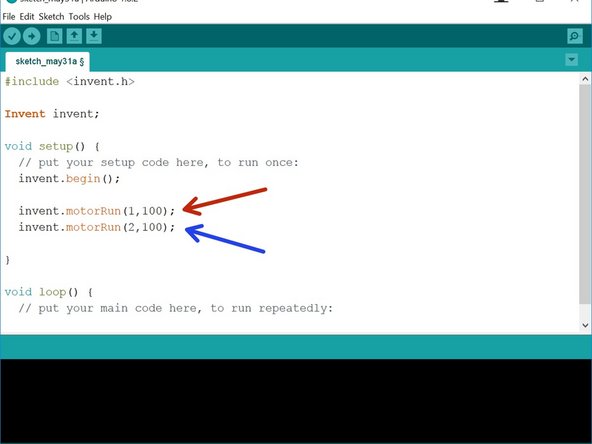
After the { bracket after the line void setup(), add the line invent.begin();
-
This line actually starts the board so it is ready to use.
-
When you start any new program, make sure these three lines are there otherwise it won't work!
-
-
-
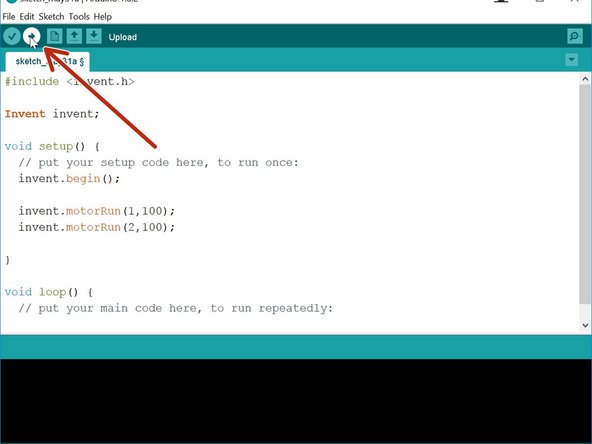
Now we're all setup, let's make a simple program so the robot drives forwards.
-
After the invent.begin(); line, add the following two lines into your program:
-
invent.motorRun(1,100);
-
invent.motorRun(2,100);
-
Can you guess what the robot will do? Let's upload the code and find out!
-
-
-
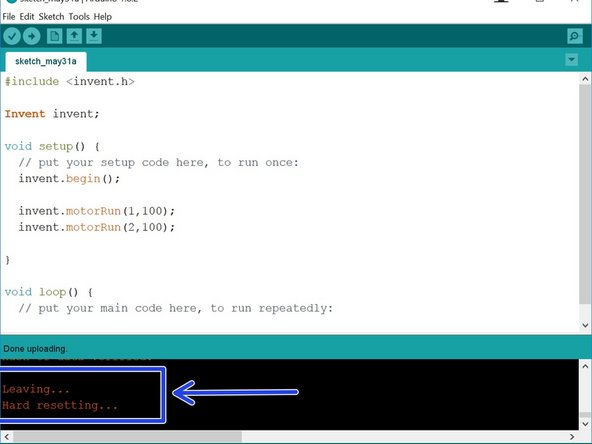
To upload the code, click the upload button at the top of the Arduino window.
-
Lots of text will appear in the bottom window - wait until it says Leaving.... Hard resetting..... before unplugging your robot!
-
If your code or robot has any problems, they will appear down here, and should give you some help to fix them.
-
Don't forget - if your robot doesn't program, check the board and port are selected correctly first!
-
-
-
Unplug the USB cable, and turn on the power switch on the robot - the LED should turn green.
-
To start the program, you need to press the run button - this is the small button on the black board closest to the wheels.
-
Press the button and the robot should drive forwards!
-
Be careful your robot doesn't drive off the table.
-
The other small button will reset the robot so your program starts from the top - try it, the motors should turn off!
-
-
-
Let's change the code so the robot doesn't drive forever.
-
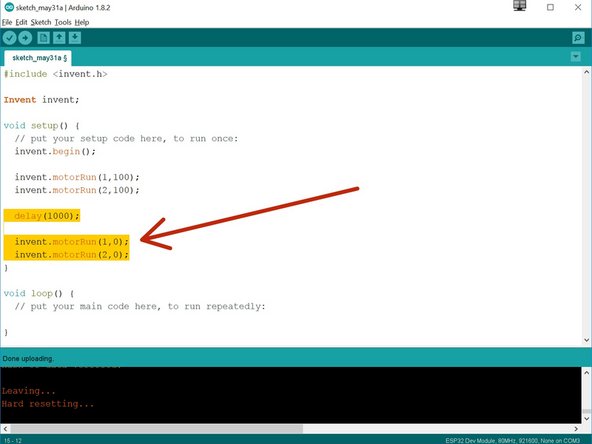
Add the highlighted lines to your program.
-
Can you guess what they might do?
-
The delay(1000); just makes the robot wait before moving on to the next line. It uses milliseconds - there are 1000 milliseconds in 1 second, so this line makes the robot wait or 1 second.
-
The other two motorRun lines make the motors stop - we'll explain more about these in the next section!
-
The semicolons ( ; ) are very important - they must always go at the end of a line that does something, like turning a motor on or a delay.
-
Upload and test the program - your robot should drive forwards and then stop!
-
-
-
Now you can make your robot drive and stop, you need to save the stranded astronaut.
-
On the front of your robot there are two magnets - if they get close enough to the astronaut, they will pick them up.
-
Write a program to make your robot drive forwards across the planet and pick up the astronaut. You will need to change the delay time so it drives forwards the right amount!
-
Don't forget to get your challenge checked off when you've completed the mission.
-
-
-
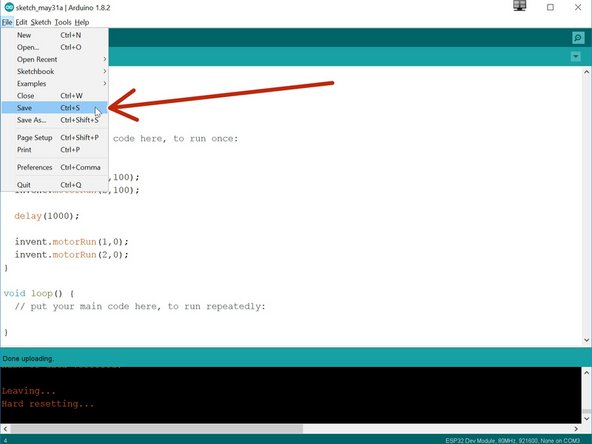
After each challenge, make sure to save your work - you might need it later!
-
Try to give your programs descriptive names so you know what they do.
-
-
-
For this extension challenge, add some more lines of code to make your robot:
-
Drive forwards
-
Pickup the astronaut
-
Reverse back again
-
See if you can work out how to change the numbers in the motorRun lines to make the robot reverse - make some changes and try it out!
-


Team
