
Introduction
Let's use the Sparkle module and some switches to make a colour mixer!
Tools
No tools specified.
-
-
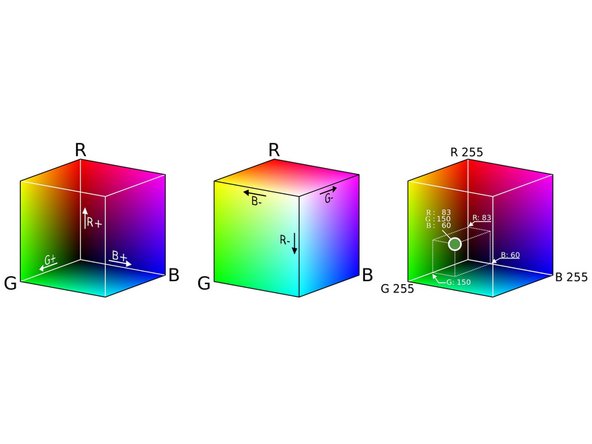
Remember how each Sparkle contains 3 different colour LEDs?
-
We're going to make a program using variables, that allows you to change the Sparkle colour using 2 switches.
-
Assemble your robot like the picture first!
-
Don't forget, Sparkles always need to be plugged into d1.
-
-
-
Let's setup the start of our program. Add in two pinMode lines to setup the switch pins.
-
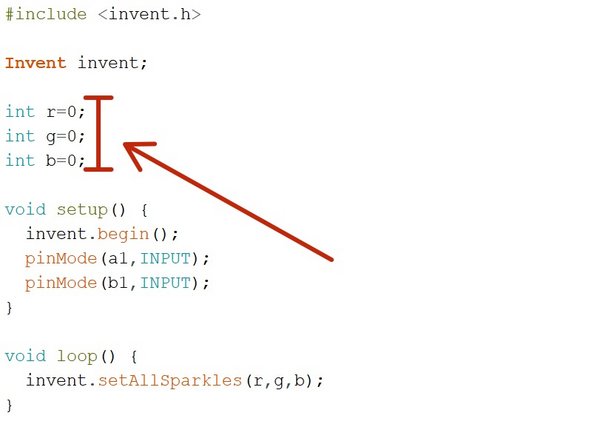
We are going to need 3 variables this time - one for red, one for green, and one for blue
-
Add three new variables at the top of the program - they should all be int type.
-
Call them r, g and b (for red, green and blue), an initialise them to 0.
-
We're going to use each of these variables to remember the amount of red, green and blue light we want.
-
-
-
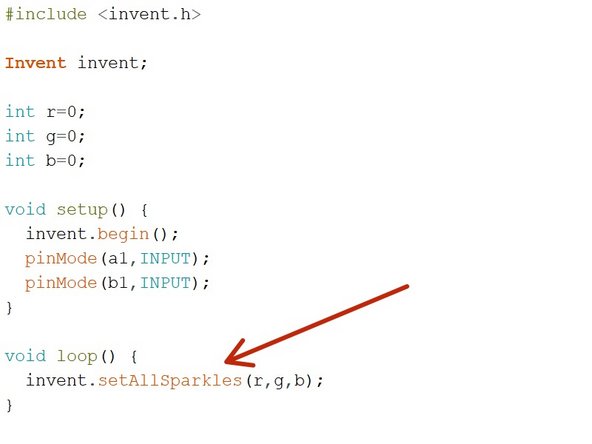
Our program needs to always be updating the colour of the Sparkles, so when the variables change, the Sparkles change too!
-
In the loop, add a line that continually sets all the sparkles using the values in the r,g, and b variables.
-
-
-
Before we can test it, we need to set r,g, and b to something other than 0, or the sparkles won't do anything!
-
Change the values to whatever you like, and test your program so far.
-
-
-
Now let's add some blocks to let use change the colour of the Sparkles using a switch.
-
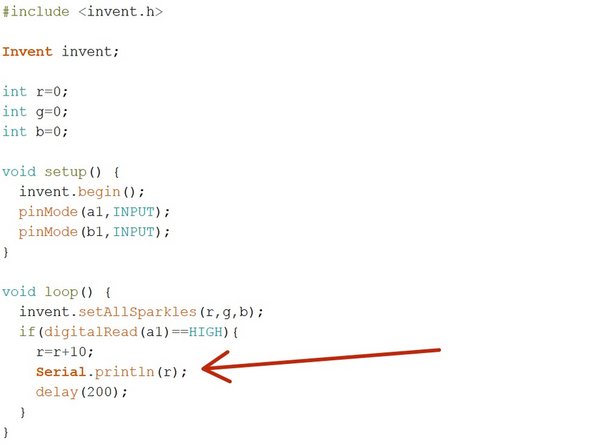
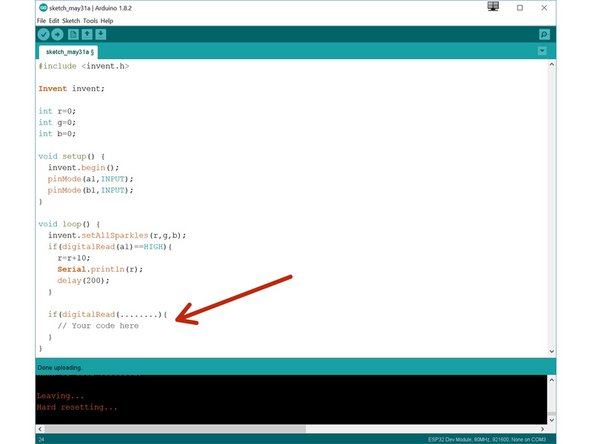
Inside the loop, add an if statement that checks if the first switch (a1) is pressed.
-
If the switch is pressed, increase r by 10.
-
Add a delay of 200 milliseconds after r is increased. Otherwise, holding down the switch will change r very quickly!
-
At the start of the program, set r, g and b to 0 again so you can see what is happening more clearly when testing your program.
-
There are some hints in the picture if you need them!
-
-
-
You probably noticed when testing your program that if you press the button enough times, the amount of red seems to start from zero again.
-
This is because the amount of red, green and blue in a Sparkle cannot be more than 255!
-
When r is more than 255 (when you have pressed the button more than 25 times), the Sparkle will show the value of r minus 255.
-
For example - 260 is more than 255, so the Sparkle will actually show 260-255=5!
-
-
-
We can investigate this by getting the robot to send information back to the computer!
-
The function Serial.println() will send information back over the USB cable, which we can view on the computer as the robot runs the program. We can send back text, numbers or even variables!
-
Add the line Serial.println(r) inside the if statement to send back the value of r each time it is changed.
-
Program the robot and keep the USB cable plugged in!
-
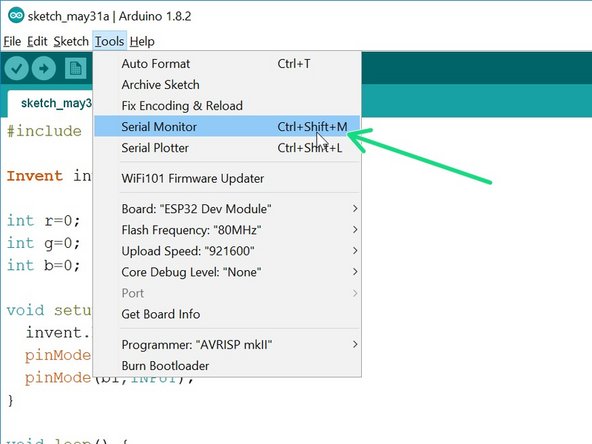
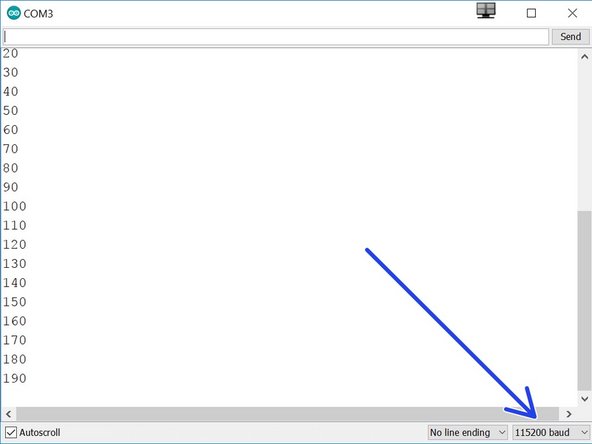
When the program is running, click on Tools > Serial Monitor to view the information the robot is sending back.
-
Make sure the baud is set to 115200.
-
-
-
We can now change the amount of red, but we want a colour mixer! Let's add another colour using the other switch.
-
Add another if statement, that checks the second switch (b1) and increases g by 10 if it is pressed.
-
This should be quite similar to the first one! Add another Serial.println line to see the value of green as well as red.
-
Make sure to test your program properly before moving on. What do you notice when you add equal amounts of red and green?
-
-
-
You may have noticed that we have run out of switches for the third colour, blue - but there is a solution!
-
What if we made a program that could increase b by 10 if both switches are pressed at the same time?
-
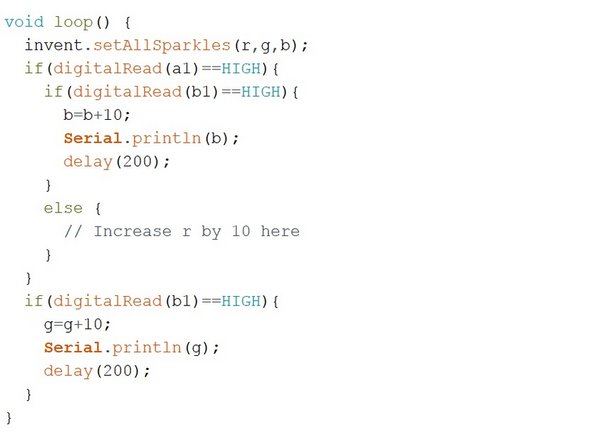
To do this, inside the if statement that checks the first switch, put an if/else statement that checks the second switch.
-
If the second switch is pressed as well, increase b by 10 instead.
-
Else, just increase r by 10 as before.
-
Don't forget to wait 200 milliseconds!
-
There are some layout hints in the picture if you need them.
-
-
-
You've probably found the last program doesn't quite work correctly - if you press both switches, the blue and green both increase!
-
This is because the second if statement is still true if we are holding down both switches, so g is also increased by 10.
-
Add an if/else statement inside the second if statement just like the one inside the first if statement to fix this.
-
Congratulations - you have made a switch controlled colour mixer!
-
-
-
When r, g and b are all the same, the Sparkles will be white.
-
Add code to your program to:
-
Check if r, g and b are all the same
-
If they are, sound the buzzer!
-
You will need to add the buzzer module and plug it into C.
-
Here's a hint - you can check if 1 condition AND another condition is true by using the && symbol - for example, if(digitalRead(a1)==HIGH && digitalRead(b1)==HIGH) is only true if both a1 and b1 are pressed.
-


Team
