
Introduction
Using a switch input and an if statement, make your own Morse Code machine to transmit any letter you like!
Tools
No tools specified.
-
-
So far, we have only used outputs - things that the robot can change to HIGH or LOW.
-
Inputs work in a similar, but opposite way - they can send a HIGH or LOW signal back to the robot!
-
Our program then needs to decide what to do, depending on whether the signal is HIGH or LOW.
-
The switch module is a great example of an input - when one of the switches is pressed, the pin it is connected to will go HIGH.
-
-
-
Assemble your robot like the picture. The connections should be:
-
Red LED - a1
-
Green LED - b1
-
Switch - c1
-
Buzzer - d1
-
-
-
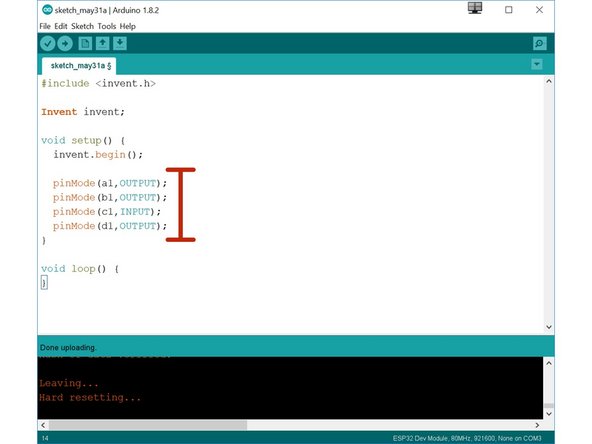
We now have 4 things connected, so we need 4 pinMode lines!
-
The switch is an INPUT, and the rest are OUTPUTs.
-
Add in 4 pinMode lines to a blank program like in the picture to setup our inputs and outputs.
-
-
-
To use an input, we need to read it to see whether it is HIGH or LOW.
-
We can use the digitalRead function for this - it only takes 1 input, which is the pin you want to read.
-
In our case, this is c1!
-
digitalRead will return HIGH if the switch is pressed, and LOW if it isn't.
-
-
-
To use an input, the robot needs to know how to make a decision.
-
We can do this with an If statement!
-
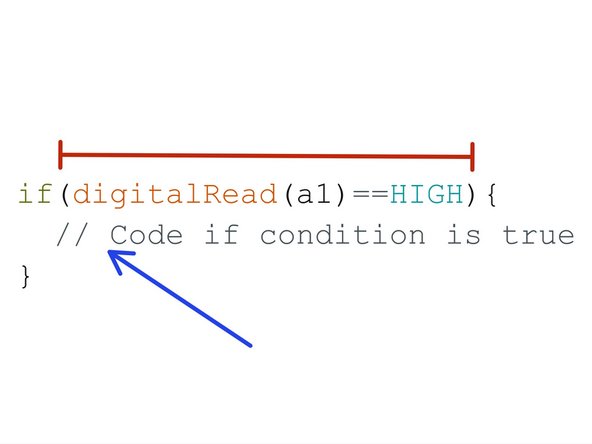
An If statement has two parts:
-
Condition - this is a test, and it goes in the normal brackets after the if. It will usually test if something is equal to something else - here we are seeing if a1 is HIGH.
-
Conclusion - this some code inside the curly brackets, that is only run if the condition is true.
-
-
-
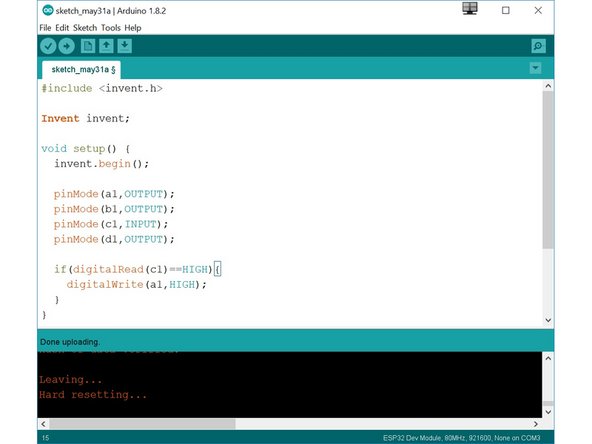
Make the program in the picture - it tests if the switch is pressed, and then turns on the red LED if it is.
-
Test it out - does it do what you expect?
-
-
-
You may have found the LED only turns on if you are holding the switch when you press the run button.
-
This is because the switch is only checked once - in the setup!
-
Move the if statement to the loop, and test it out again - this way, the switch is checked every time the loop is run.
-
The LED should now turn on when you press the switch!
-
-
-
Let's add some more code so the LED turns off when we let go of the switch!
-
Add another if statement into the loop, that checks if the switch is LOW and then turns off the red LED.
-
Your LED should now be controlled by the switch!
-
-
-
Often, we want to do one thing if something is HIGH, and something else if it is LOW, like turn on/off the LED.
-
We can use two if statements, but there is a shorter way - using an else.
-
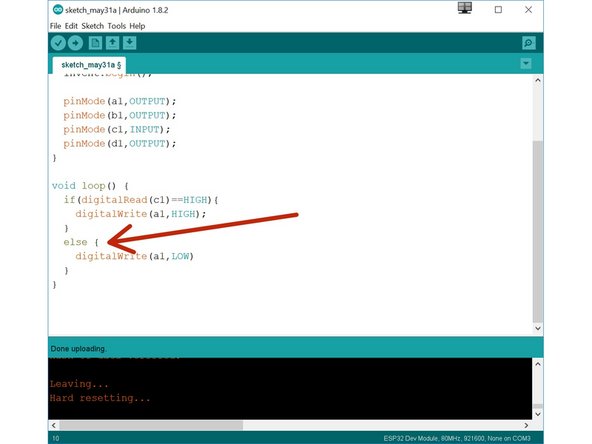
Replace your second if statement with an else, to make an if/else statement:
-
If the condition is true, the code inside the if statement is run
-
If the condition is false, the code inside the else statement is run.
-
Your LED should still be controlled by the switch, but the program is simpler!
-
-
-
You may have noticed we have actually made our own Morse Code machine already!
-
By holding down the switch for a long time you can send a dash, and a short press would send a dot.
-
For this challenge, add some more code so that:
-
When the switch is pressed, the green LED and buzzer are on
-
When the switch isn't pressed, only the red LED is on.
-
-
-
Time for a harder challenge!
-
Using the Morse Code video from the first step, can you send a secret message to your neighbour?
-
Get them to decode it and see what they come up with - no speaking allowed!
-
-
-
A super hard challenge now - can you write a program that sends Morse Code for your initials (or even your whole name) automatically, but only when you press the switch?
-
If you're feeling really clever, try and use some loops to reduce the length of your program if you need to send lots of dots or dashes in a row.
-


Team
