
Introduction
Learn about analogue inputs to make an even more sophisticated line following robot, that will smoothly follow any path.
-
-
We just need the line sensor for now - make sure your robot is setup like the picture.
-
-
-
To make a smoother, better line follower, we need to use the line sensor in analogue mode.
-
So far, we have been using it as a digital sensor - it can only be ON or OFF (1 or 0).
-
Analogue inputs (and outputs) can have any value - think about the difference between a digital and an analogue clock
-
A digital clock must display a whole number of minutes
-
But on an analogue clock, the minute hand can be anywhere - even halfway between two minutes!
-
-
-
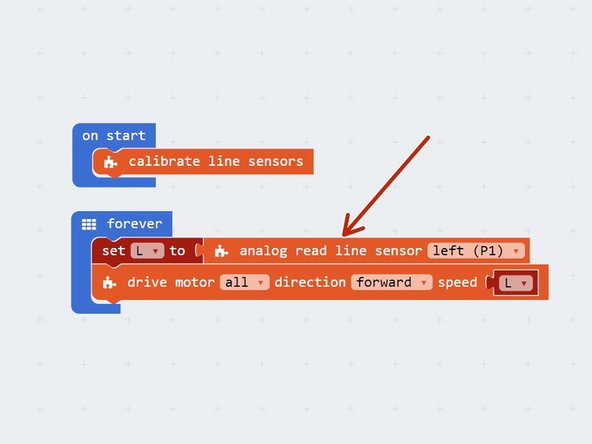
Build the simple test program in the picture - you will need to create a new variable called L.
-
Be sure to use the analog read line sensor block from the invent menu.
-
Program your robot, and let it calibrate the sensors.
-
Try moving the robot slowly from one side of the line to the other.
-
See how the motor speeds change gradually as you move the sensor across the line?
-
-
-
We can use this gradual change to smoothly change the amount the robot turns as it get further from the line!
-
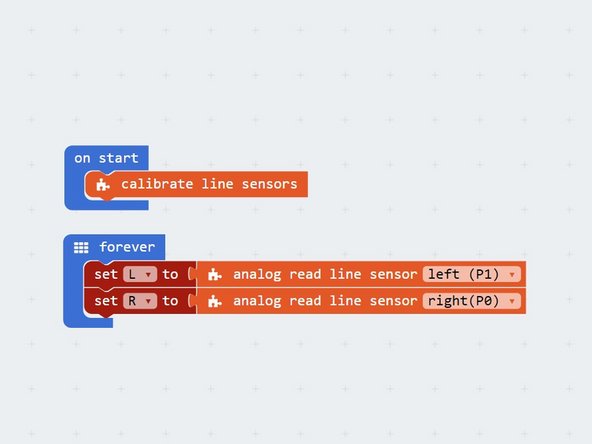
Add an "R" variable as well to keep track of the value of the right sensor.
-
Let L = the analogue value of the left sensor, and R = the analogue value of the right sensor.
-
-
-
The larger the difference between L and R, the further the robot is from the line so the more we need to turn.
-
For example, if both sensors are on the line, we don't need to turn at all and L and R will have the same value.
-
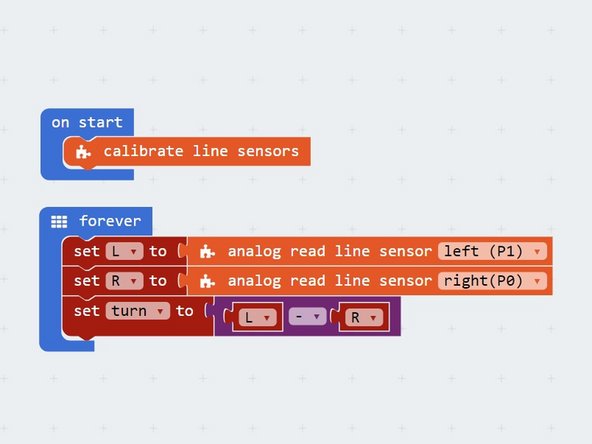
Add a new variable called turn.
-
After getting the values of L and R, set turn equal to the difference between L and R.
-
-
-
Let's use the turn variable to set the speeds of the motors.
-
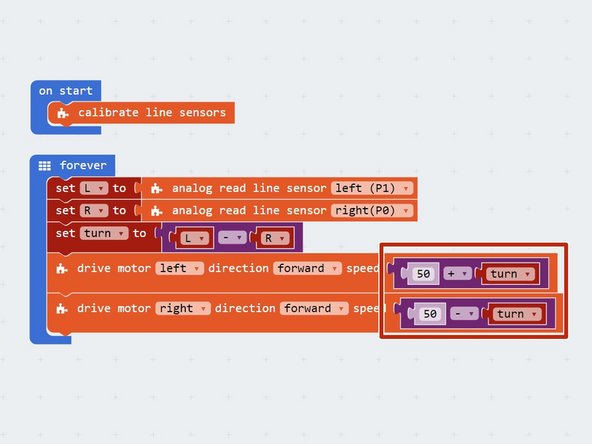
Add some motor blocks that use the turn variable to set the speed like the picture.
-
Test it out - this should follow the line really smoothly!
-
Do you understand how the code works? (hint: turn is positive when we need to turn right, and negative when we need to turn left)
-
It might not quite work for really tight turns - look at the next step for how to fix it.
-
-
-
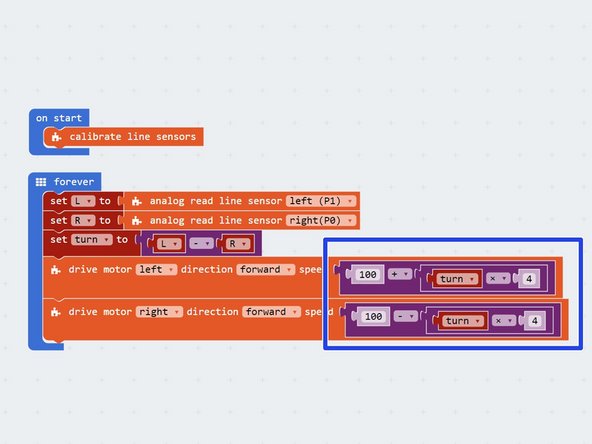
You might have noticed that while the new program is smooth, it isn't as fast as the old two sensor digital program.
-
To make it faster, we need to make sure 1 wheel is always going 100% forwards, and then change the speed of the other wheel only based on how large turn is to follow the line.
-
Change your program so it looks like the picture - this will make sure 1 wheel is always going at 100%.
-
To make this work for tight turns, we need to multiply the turn variable to it has a bigger effect. Try it out with 4 to start with - you might need to adjust this depending on your exact robot setup, and how tight the turns are on the line.
-
Be sure to test it properly - try adjusting things until your program is 100% reliable.
-
-
-
If you're feeling really advanced, add the Sparkle module back in and set the colours of the LEDs proportionally based on how far away from the line the robot is!
-
Your robot can also get lost and now has no way of finding the line again - try and add the code you wrote previously back in so the robot can't get lost, or at least stops if it loses the line completely.
-


Team
