
Introduction
Even robots need to rest sometimes - let's build a reaction timer game to play when we have some time off from the mission.
Tools
No tools specified.
-
-
So far we have only used our green and red LEDs separately - however you actually have an orange LED as well!
-
Because both LEDs are in the same component, if we turn on the green and red LEDs at the same time, it will look orange.
-
Plug your green and red LEDs into your board, and write a simple program to turn them both on and check it looks orange.
-
-
-
A Reaction Timer is a game that tells you how quickly you managed to react to something.
-
For our timer, we're going to see how long it takes the player to press a button when a red LED comes on.
-
After they press the button, it will tell the player how well they did:
-
A green light for a really fast reaction (less than 0.1 seconds) - good job!
-
An orange light for an average reaction (less than 0.2 seconds)
-
A red light for a slow reaction (more than 0.3 seconds)
-
After telling them how well they did, the game should automatically restart so they can play again.
-
-
-
Our program for the reaction timer game is going to be quite complicated!
-
Let's think through the plan first so we know what we're doing:
-
Wait 5 seconds, turn on red LED
-
Wait 100 milliseconds - if the player has pressed the button already, turn on green LED only (really fast reaction!)
-
Wait another 100 milliseconds - if player has pressed the button now, turn on green and red LEDs (average reaction time)
-
Wait a final 100 milliseconds - if player has pressed button, turn on red LED (slow reaction)
-
Wait a few seconds for the player to see their result, then go back to the start and repeat everything forever!
-
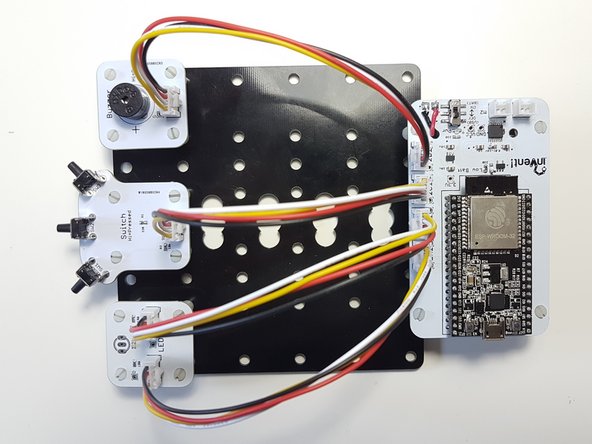
Your game device should be assembled the same way as for the previous section - check the picture if you can't remember.
-
-
-
Now we know the plan, start with a blank program. Don't forget the 3 lines we always need! Check the picture of a blank starting program if you can't remember.
-
Add 4 pinMode lines to setup your inputs and outputs properly. Check the last lesson if you can't remember how to do this!
-
Add some lines of code to the loop to make the program delay for 5 seconds, then turn on the reds LED.
-
-
-
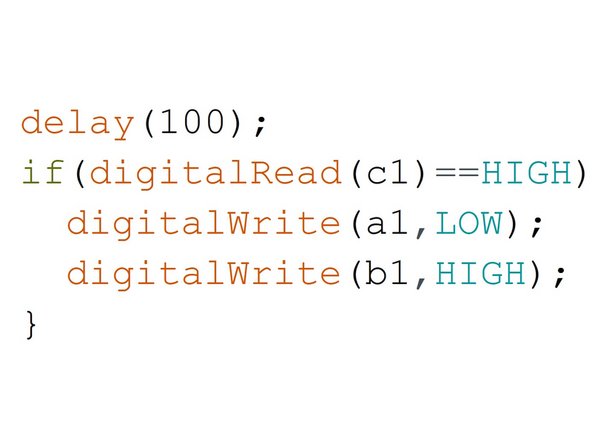
Now we need to put in three similar sections of code, to see if the player has fast, average or slow reactions.
-
Remember the plan? Each section should:
-
Wait 100 milliseconds
-
Check if the switch is pressed
-
If it is, turn on the correct colour LED for fast, average or slow
-
You should end up with three sections which all look quite similar, which should go in the loop after the code that turns on the LED after 5 seconds.
-
Check the picture for a hint of how to do the first one - you'll have to do the next two on your own! This is only one of the sections by itself, and you'll have to add it to the program you made in the last step.
-
-
-
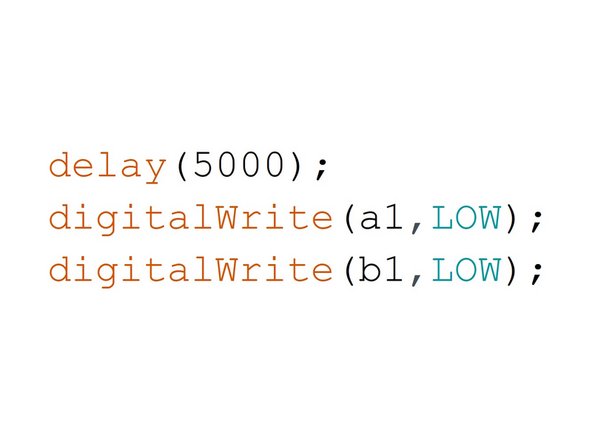
At the end of the game, we need to wait for a few seconds so the player can see how they did, and then make sure both LEDs are turned off before the game starts again.
-
Add these finishing touches - check the picture for a hint on the lines of code you might need!
-
-
-
An important part of writing programs is to make sure you test them properly, so you can fix any problems!
-
You don't want to give a program to someone to use, only for them to have loads of problems which you could have found by testing it first.
-
Test your program with your neighbour - see if either of you can get a green reaction time!
-
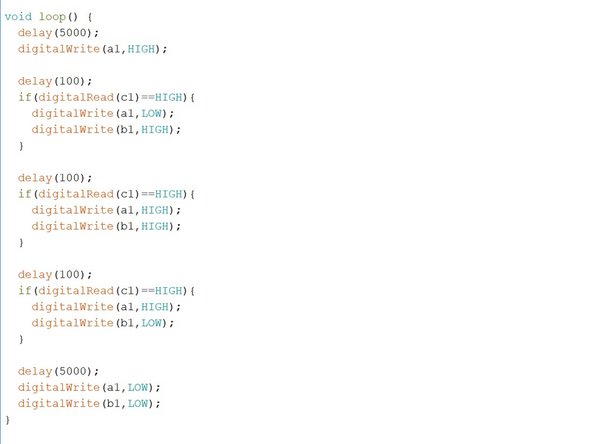
If you still can't get your program to work, have a look at the example in the picture. This isn't the only way to program the game, and some of the code is not required - can you work out which parts?
-
-
-
You will find it very difficult to get a green result (without cheating by holding down the switch!).
-
This is because the average human reaction time is over 200 milliseconds.
-
You will probably only be able to do it by counting down the 5 second delay in your head.
-
Even the fastest recorded reaction time is over 100 milliseconds - this is because it takes time for the signal from your eyes to reach your brain, then the signal from your brain to get sent down your nerves to move your muscle to press the switch.
-
If you want to measure your reaction time accurately, head to this site: http://www.humanbenchmark.com/tests/reac...
-
-
-
Let's make some changes to the game using the buzzer, to make it easier to use. You need to:
-
Make the LED turn green when the player needs to press the switch, and red during the 5 second delay when they shouldn't.
-
Instead of the LED colour showing how well you did, make the buzzer buzz once for each 100 milliseconds it took the player to press the switch.
-
For example, the 'fast' reaction time is 100 milliseconds, so the buzzer should buzz once. The 'average' reaction time is 200 milliseconds, so it should buzz twice (and so on).
-
Make sure to test your program afterwards!
-
-
-
Let's improve our reaction timer game even more.
-
Add some more IF statements and delays so your reaction timer can count up to 500 milliseconds.
-
Inside your IF statements, use for loops to make your buzzer buzz the correct number of times, so you can reduce the number of lines in your program.
-
Don't forget to save your program, you might need it later!
-


Team
