
Introduction
Use your iOS device and the micro:bit app to control your car!
-
-
To control the robot using your phone, we'll be using the micro:bit's internal bluetooth module.
-
Follow the video to learn how to pair your micro:bit to your phone!
-
-
-
-
Like before, we need to install an extension so that the micro:bit knows how to work with our phone.
-
Install the "devices" extension by clicking on it.
-
When you get this message, click "Remove extension(s) and add devices".
-
Make sure you're using the https://www.techcamp.org.uk/invent version of MakeCode!
-
-
-
When working on larger code projects like this one, it's always good to have a plan of what exactly your code will do.
-
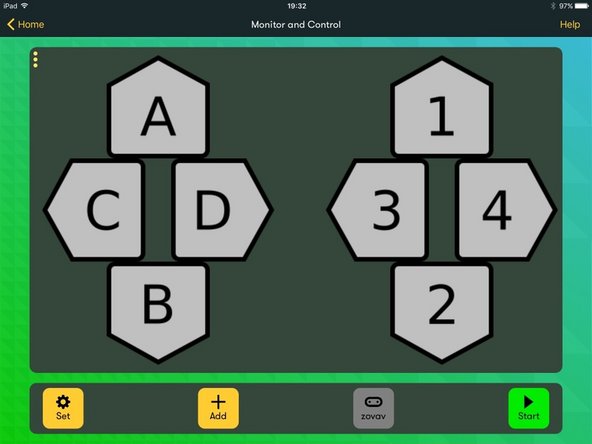
The micro:bit app has a simple game pad with a D-Pad and 4 buttons. In our code, we want the car to go forward as long as button 2 is held down and backwards when 4 is held down. C and D should make the car go left or right, but only if 2 or 4 is also pressed down.
-
-
-
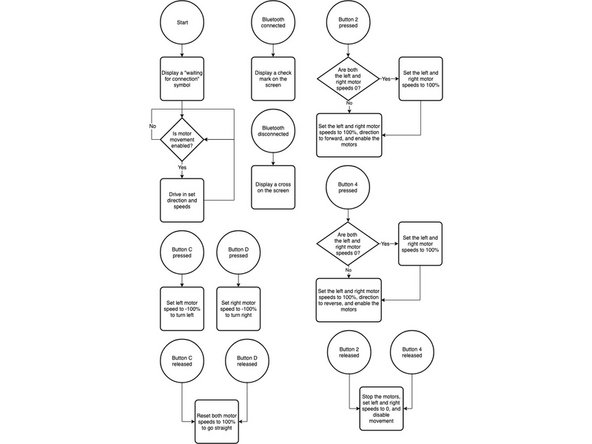
Now we know what we want our code to do, it's good to flowchart our code so we know the exact process to get there.
-
In a flowchart, a circle represents an "event" in our code, like a button being pressed or even the program starting, a square represents a process, such as moving forwards, and a diamond represents a decision, just like an
ifstatement. -
Arrows in a flowchart represent the flow of the program between actions.
-
The image here is an overview of our program. Let's take a closer look at each section.
-
-
-
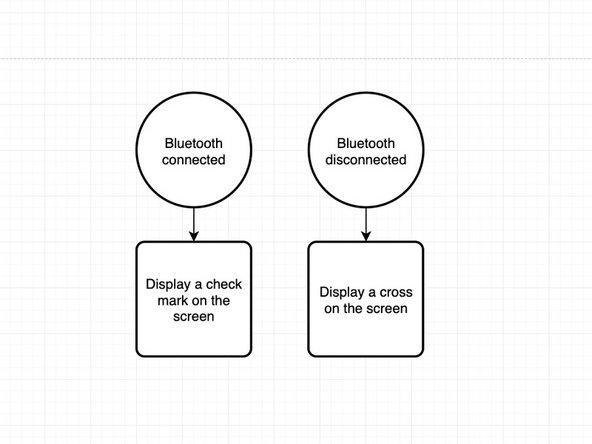
It's useful to know whether our phone is actually connected to the car or not.
-
We can put two event handlers in our program which will display a check mark if bluetooth is connected, or a cross if it is disconnected.
-
In TypeScript, an event handler is simply a function to run when an event occurs.
-
-
-
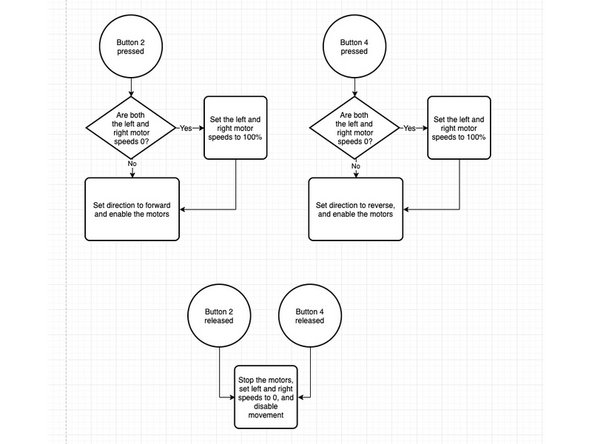
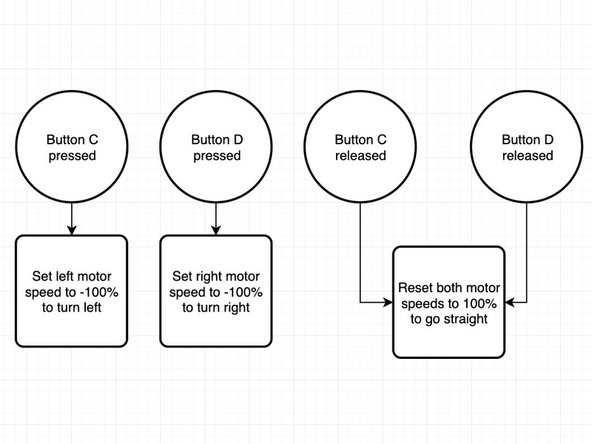
If button 2 or 4 is pressed, we want to first check if the left and right speeds are both 0 (or off). If they are, set them both to 100% speed.
-
Next, just set the direction to forwards or backwards and enable the motors.
-
We also need code to run if the buttons are released, otherwise the car would go forwards or backwards forever! Here, we have it just set everything back to off if either button is released.
-
Notice the amount of shared logic between the two events. This indicates that we'll want to use functions in our code to avoid repeating ourselves!
-
-
-
Finally, we just need to handle the left and right logic. Luckily, this is much simpler.
-
All we need to do is set the left and right speeds to go in the direction we need. This will cause the car to go left or right.
-
If left or right is released, just set the direction to straight again.
-
-
-
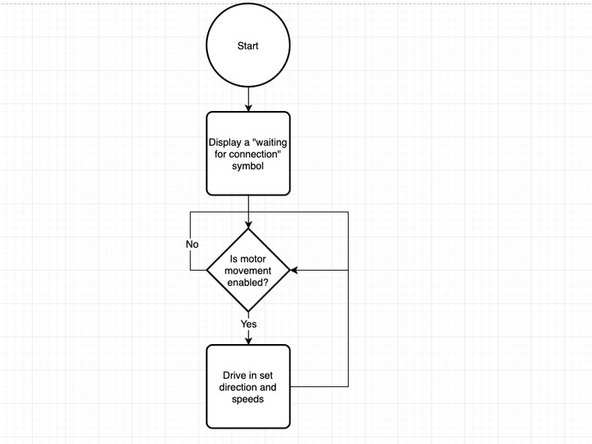
Since the rest of the code is modifying global variables, the main program loop is fairly simple.
-
First, we display a "waiting for connection" symbol on the display (we'll use a horizontal line)
-
Next, if the motors are enabled, just drive in the set direction and speeds. Otherwise, loop back and wait again.
-
Notice how the decision loops back on itself. This indicates that this code will go in our
basic.foreverloop!
-
-
-
Now that we've planned out the program, let's actually write it!
-
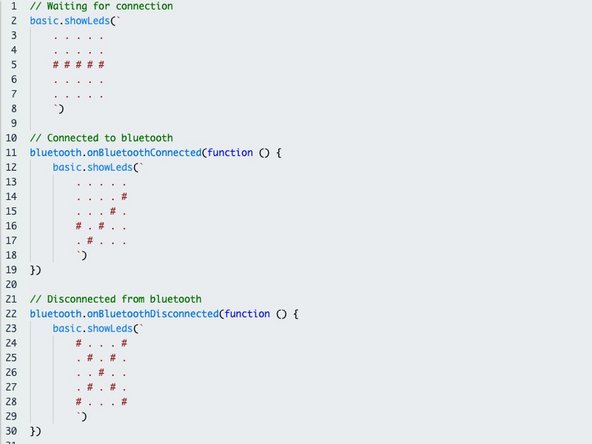
Let's start by writing the bluetooth connection display handlers.
-
We can use the
basic.showLedsfunction to draw out what we want to see on the screen, and thebluetooth.onBluetoothConnectedfunction to display a check when bluetooth is connected.
-
-
-
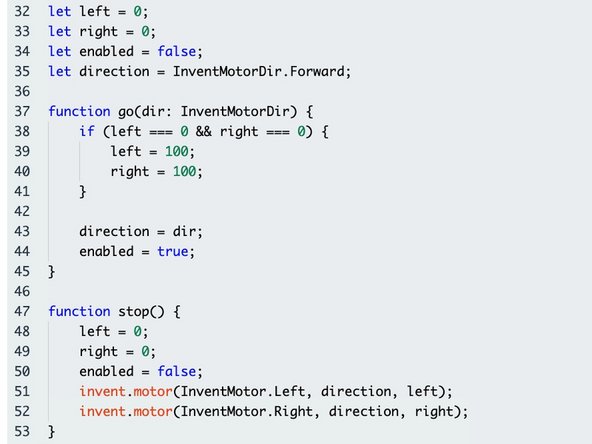
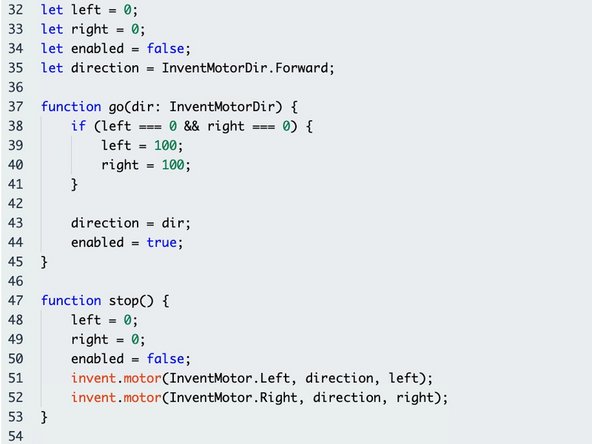
Next, we'll define our helper functions and variables. We define variables for the left and right motor speeds, whether the motors are enabled, and the current direction (forwards or backwards).
-
In TypeScript, functions are defined using the
functionkeyword, just likedefin Python. Notice how ourdirparameter has a second part. This is its type, and TypeScript needs to know this so it knows what is being passed to the function. -
You may recognise the
functionkeyword from previous code, such as what we define inside thebasic.foreverloop. This is because when we work with those, we actually define a function which then gets passed to thebasic.foreverfunction. A function without a name is called an anonymous function, and they are incredibly useful! -
You can think of the
basic.foreverfunction as taking another function as a parameter, which it then will call forever. A function that takes a function as an argument is known as a higher-order function.
-
-
-
A variable type is simply a piece of information telling the computer what kind of information the variable holds, such as a
numberorstring. Here, we tell the computer that thedirparameter is a `InventMotorDir`. If you tried to pass a string to this function, you'd get an error! -
TypeScript is smart enough to automatically determine types on variable assignment, which is why we can do
let left = 0. Technically, the full version of this would belet left: number = 3though. -
Notice that the logic of the go and stop functions follow what we defined in the flowchart.
-
-
-
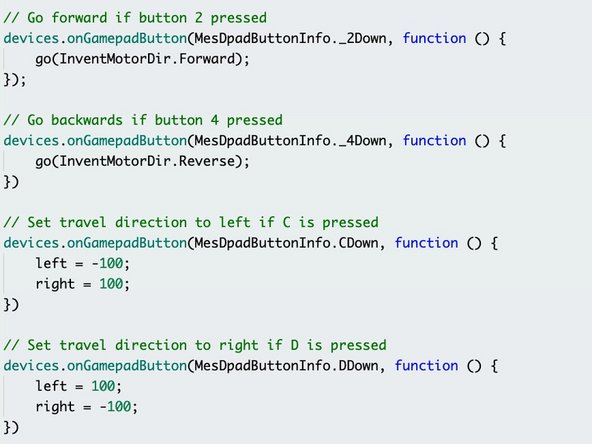
Now we can write the handlers for the buttons. We can use the
devices.onGamepadButtonfunction, which takes a button action and a function to call when the event occurs. -
Here, we have two handlers for the
_2Downand_4Downevents to go forwards and backwards respectively. -
We also have two handlers for
CDownandDDownto set the left and right speeds to make the robot turn.
-
-
-
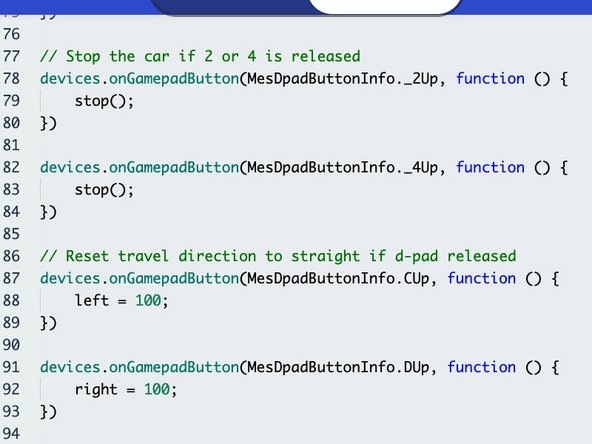
Finally, we add code for the button up events (when the button is released), so that the car can reset itself.
-
-
-
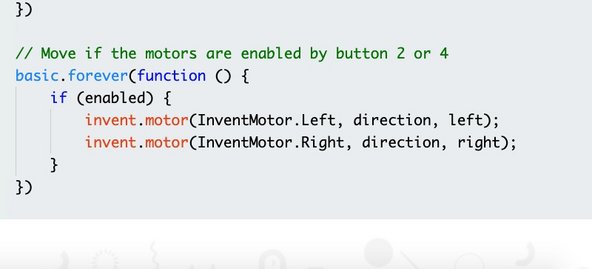
To finish off our program, we just tell the motors to turn on if they're enabled, just like in the flowchart!
-
Install the code to your micro:bit and get ready to connect your phone to it.
-
-
-
In the micro:bit app, go to "Monitor and Control"
-
Press the Start button the the lower right corner to connect to the micro:bit (make sure it's on!)
-
You'll also need to add a controller by going to "Add" and then selecting "Gamepad"
-
-
-
Press 2 to accelerate and 4 to reverse. You can use C and D to turn left and right!
-
-
-
We still have a bunch of buttons that have gone unused in the app!
-
Can you think of new features to add? Maybe you could make the screen display a symbol with one button, or activate a buzzer as a horn!
-
You can also experiment with the other monitor and control modules, which can read information such as temperature out (as long as you've coded it in!)
-


Team
