
Introduction
Create a robot which plays ringtones using another micro:bit as a remote!
-
-
In the
musicnamespace, there is a function calledplayTone(). This function takes a note frequency and a duration and then plays that note on the output connected to P0. -
Try connecting a buzzer to P0 and run a program which plays a middle A note (440 Hz) for 1 second. You should hear a tone come from the buzzer connected to the micro:bit that lasts one second.
-
Try adjusting the frequency of the note and see how the sound of the buzzer changes! You may find that the output of the buzzer is distorted. This is easily fixed by putting a small piece of tape over half the hole of the buzzer.
-
-
-
What if instead of just one
playTonefunction, we used a bunch to play back a simple melody? -
This would be possible, but it would be a pain to convert musical notes to the raw data the function expects.
-
Luckily, this work has already been done for you! We can convert ringtones from the RTTTL format to an object that we can then use to play back melodies!
-
-
-
The RTTTL format (Ring Tone Text Transfer Language was a format designed to represent ringtones for old nokia phones, which only had buzzers similar to the one connected to our micro:bit
-
It's simply a list of the notes in a song and the duration of each note, exactly what the playTone command takes! We can convert these ringtones to a format the function can understand and use this to play back a variety of simple songs!
-
The RTTTL format was extremely popular and as such it's easy to find a variety of songs just by searching google for "RTTTL tones" or a similar search.
-
For example, this is the Star Wars theme in RTTTL format:
starwars:d=4,o=5,b=180:8f,8f,8f,2a#.,2f.6,8d#6,8d6,8c6,2a#.6,f.6,8d#6,8d6,8c6,2a#.6,f.6,8d#6,8d6,8d#6,2c6,p,8f,8f,8f,2a#.,2f.6,8d#6,8d6,8c6,2a#.6,f.6,8d#6,8d6,8c6,2a#.6,f.6,8d#6,8d6,8d#6,2c6
-
-
-
Unfortunately, there's no function that takes a raw RTTTL string and plays it back on the micro:bit. However, there is a program which will convert an RTTTL string to a JavaScript object!
-
Go to this link and download the RTTTL converter which we wrote to let you play back files on the micro:bit! (If you get a warning about running it, click Run anyway.. On macOS, you may need to right-click on the program and select Open to get it to work). You should see the screen on the right.
-
Try pasting the Star Wars example from earlier! You should see a JavaScript representation of the song appear, which you can then copy for use on the micro:bit!
-
-
-
Throughout this guide, I have referred to "objects" in the code. But what are objects?
-
For our purposes, an object is simply a kind of variable that contains multiple properties. Think of a person, they might have an
ageproperty, aheightproperty, and so on. -
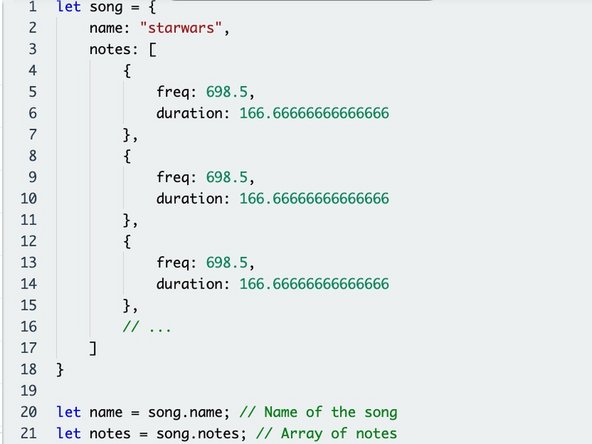
In TypeScript, we use the
{...}syntax to define objects. Have a look at the output of the converter. We have anameproperty which holds the name of the song, and anotesproperty which holds an array of note objects, each with a frequency and duration. -
If you're familiar with Python, this may look very similar to a dictionary. In fact, for our purposes here, an object is roughly synonymous with a dictionary. However, they are not the same!
-
The output of the converter will all be on one line, but we've formatted it here for clarity.
-
-
-
To access the properties of an object, we use the same dot syntax that we use for namespaces.
-
For example, to access the
nameof our song, we can usesong.name. This will return the song name. We could access the note array in the same way, usingsong.notes. -
In TypeScript, arrays work almost identically to Python.
-
-
-
We've worked with some basic types before such as strings and numbers, but what about defining our own types? What if we had a song type for example?
-
In TypeScript, we can use interfaces to define our own custom types! Interfaces work like a blueprint for an object, ensuring that the new object must have certain properties.
-
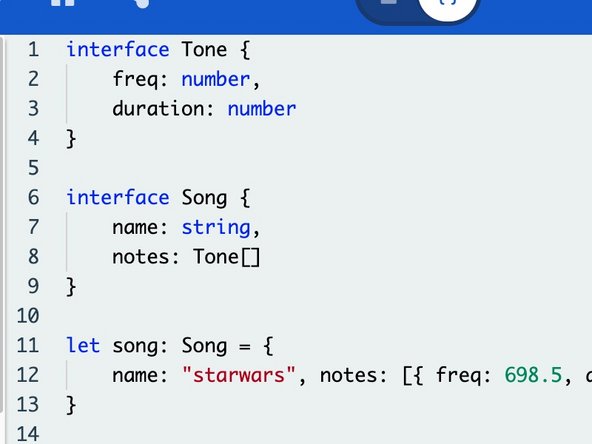
We know that a ringtone must contain a name, and a list of notes, so we can define a song interface thusly.
-
We also have to define what a
Toneactually is, which is simply a frequency and a duration. -
We can now redefine our song variable to be of type
Song, and TypeScript will now be able to ensure that our song object is valid! -
When working with custom objects in TypeScript, it's always best practice to define an accompanying interface to ensure you don't accidentally make mistakes.
-
-
-
Now that we have our song defined, we just need a function that takes a
Songand plays it on the buzzer. -
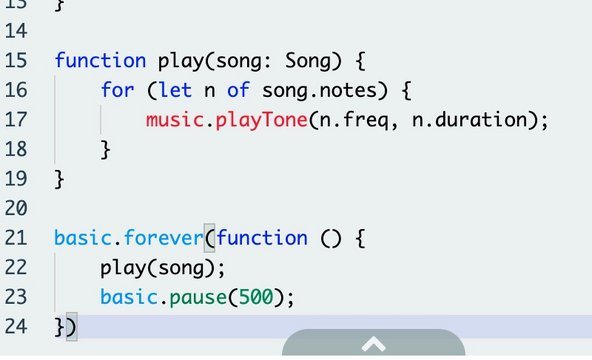
We define a function
play, which takes an argumentsongof our custom typeSong, and then uses a for...of loop (similar to for...in in Python) to play back each note on the buzzer. -
Finally in our forever loop we play the song and then wait 0.5 seconds before playing it again.
-
Download this program to the micro:bit. It should play the Star Wars theme!
-
-
-
Using the
for...ofloop and an array, can you create a playlist of songs that the micro:bit will loop through? -
You may encounter a
020error on your micro:bit (signified by the scrolling numbers 020 and then a sad face). This just means your program is too big and you need to remove a few songs.
-
-
-
Using all your knowledge from the previous courses, can you use the radio namespace to create a remote control for your playlist?
-
Pressing A on the micro:bit should go back a track and pressing B should make it go forward a track. The current song should loop forever until a new one is chosen. The remote should show the name of the currently playing song on the screen.
-
You may find the
led.stopAnimation()function useful, which clears whatever is on the screen. If you get stuck, here is an example of the remote code. You'll still need to write the player code though!
-


Team
